Year: 2016
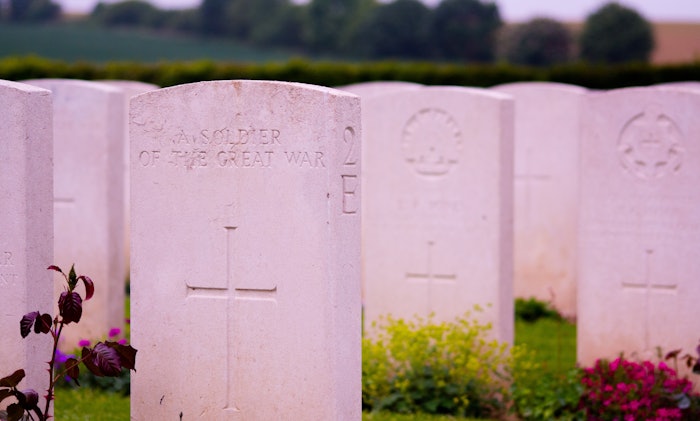
Remembering Memorial Day: More Than Just Picnics and Cookouts
Like every good American, I look forward to any holiday that falls on a Monday, especially during the warmer months, because like everyone else, I can’t wait for a day filled with cookouts, trips to the beach, and more importantly, no work. While having a day off for fun and relaxation is always nice, too often do we lose sight of the true meaning of the holiday and why exactly we celebrate and commemorate this day; it is not just a day for picnics and cookouts…
Though modern Memorial Day celebrations are centered around barbecues, beach trips, and blow-out sales, the holiday’s history is much more meaningful than that. A tradition that began during the Civil War, Memorial Day was, in its earliest form, the simple practice of honoring fallen soldiers by decorating their grave sites. During the years following the Civil War, the country struggled to come together as a whole again and repair itself from four years of death and destruction, and as a way to start the healing process and honor those who had lost their lives, several southern states began to observe and publicize Memorial Day celebrations. Northern states soon followed suit with their own tradition, Decoration Day, and over the next 100 years, Memorial Day was celebrated nationwide unofficially until it was finally declared a federal holiday in 1971.
Now, over a century later, Memorial Day seems to have fallen out of focus and become less about honoring the past and more about taking advantage of a day off. While the tradition of decorating graves is still alive and well, and many cities host parades and other official celebrations to mark the day, the holiday’s traditions and history seem to have gotten lost in the noise of sizzling hamburgers and kids splashing in the pool.
In case you need a reminder of the meaning of this patriotic holiday, here are 10 Memorial Day facts that will change the way you celebrate.
1. Memorial Day Has Its Roots In The Civil War

The Civil War was the deadliest conflict in U.S. history, and after its conclusion, the country had to create its first national cemeteries to accommodate all the bodies of fallen soldiers. In the late 1860s, Americans began the tradition of decorating the graves of fallen heroes in their towns and cities. From that tradition, Memorial Day was born.
2. Recently Freed Slaves Organized One Of The First Commemorations
In 1865, recently freed slaves, teachers, missionaries, and soldiers joined forces in Charleston, S.C., to honor the over 250 deceased Union soldiers buried in a Confederate prison camp. The group worked together to properly rebury the bodies, and when their work was done, they came together with community members, school children, social and aid organizations, and more to remember the fallen dead and decorate their new burial sites. It is considered one of the earliest Memorial Days in the U.S.
3. Memorial Day Was Once Called Decoration Day
In its earliest days, Memorial Day went by another name in the northern states — Decoration Day. Organizers in several cities and states began the spring tradition of decorating graves of soldiers and taking time to remember their sacrifices.
4. The Holiday Was “Founded” By General John A. Logan
General John A. Logan of the Grand Army of the Republic, a veteran soldier of the Mexican-American and Civil War who would later become a celebrated politician, was the man behind one of the first Decoration Days. In 1868, he started the celebration we now call Memorial Day, a special day he proclaimed was meant to honor Americans who died “in defense of their country during the late rebellion” and beyond.
5. More Than 260,000 Graves Are Decorated In Arlington

While a lot of Memorial Day’s history seems to be often forgotten, one tradition remains: decorating the graves of soldiers. In the Arlington National Cemetery, the 3rd U.S. Infantry Regiment, otherwise known as the Old Guard, has been putting flags on the more than 260,000 graves every Memorial Day for over 60 years. The tradition is known as “Flags In.”
6. Some Southern States Still Celebrate Confederate Memorial Day
Decoration Day in the northern states was meant to honor the fallen soldiers of the Union Army, but southern states wanted to honor their dead brothers and sisters, too. Confederate Memorial Day is still a state holiday in several southern states, including Texas, Alabama, Georgia, Mississippi, Florida, South Carolina, and North Carolina, and its traditions include ceremonies, grave decorating, re-enactments, and church services.
7. Red Poppies Are The Symbol Of The Holiday

The tradition of wearing red poppies to honor Memorial Day started in 1915 and was inspired by a World War I poem by John McCrae, “In Flanders Fields.” After Moina Michael, an American war secretary, read the poem whose lines include “In Flanders fields the poppies blow/ Between the crosses, row on row,” Michael began wearing a silk poppy to honor fallen soldiers and eventually started selling them to her friends and coworkers, and even campaigned for them to become an official symbol of memorial. In 1921, the American Legion adopted the poppy as their symbol, and still sells them on Memorial Day today.
8. Waterloo, New York Is Recognized As The Birthplace Of Memorial Day
May different cities and towns, including Boalsburg, Pennsylvania, claim to be the birthplace of Memorial Day, but Waterloo, New York, is officially considered the starting place of the holiday. Thanks to a presidential proclamation in 1966, Waterloo, a town that has held a Memorial Day celebration annually since 1866, is the only town that can make that claim to fame, though many others still try.
9. Activists Use The Day To Bring Attention To POWs And Soldiers MIA

This Memorial Day marks the 29th Rolling Thunder Annual Memorial Day Demonstration, an activist tradition started by Vietnam War veterans that seeks to bring attention to prisoners of war and soldiers missing in action. For nearly three decades, thousands of bikers descend on Washington, D.C., each Memorial Day weekend to not only raise awareness for their cause, but to remember those soldiers missing or lost, to visit memorials, and to hear speeches from other veterans, supporters, and politicians.
10. Memorial Day’s Moment Of Silence Is A Law
When Memorial Day’s moment of silence comes around on Monday, you shouldn’t just observe it because it’s respectful, but because it’s the law. In 2000, Congress passed legislation declaring 3 p.m. local time the National Moment of Remembrance, and in 2010, Barack Obama released a Presidential Proclamation asking all Americans to observe the moment.
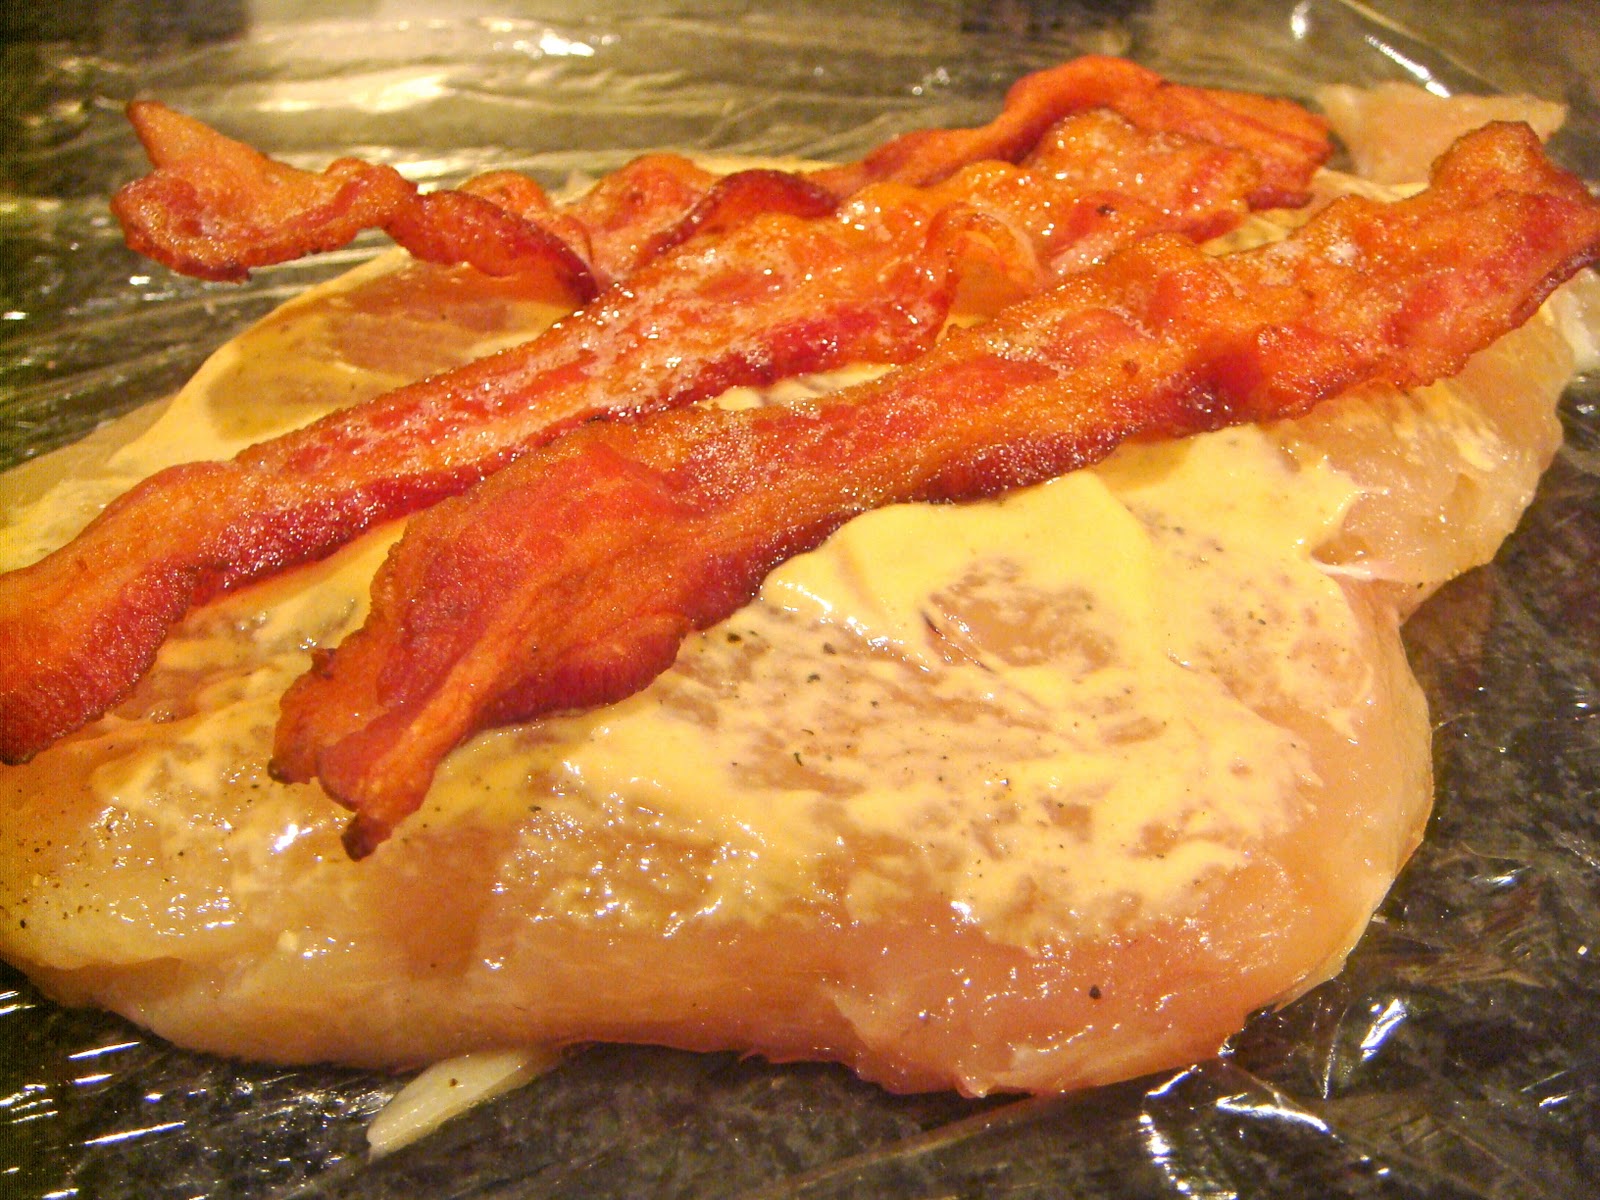
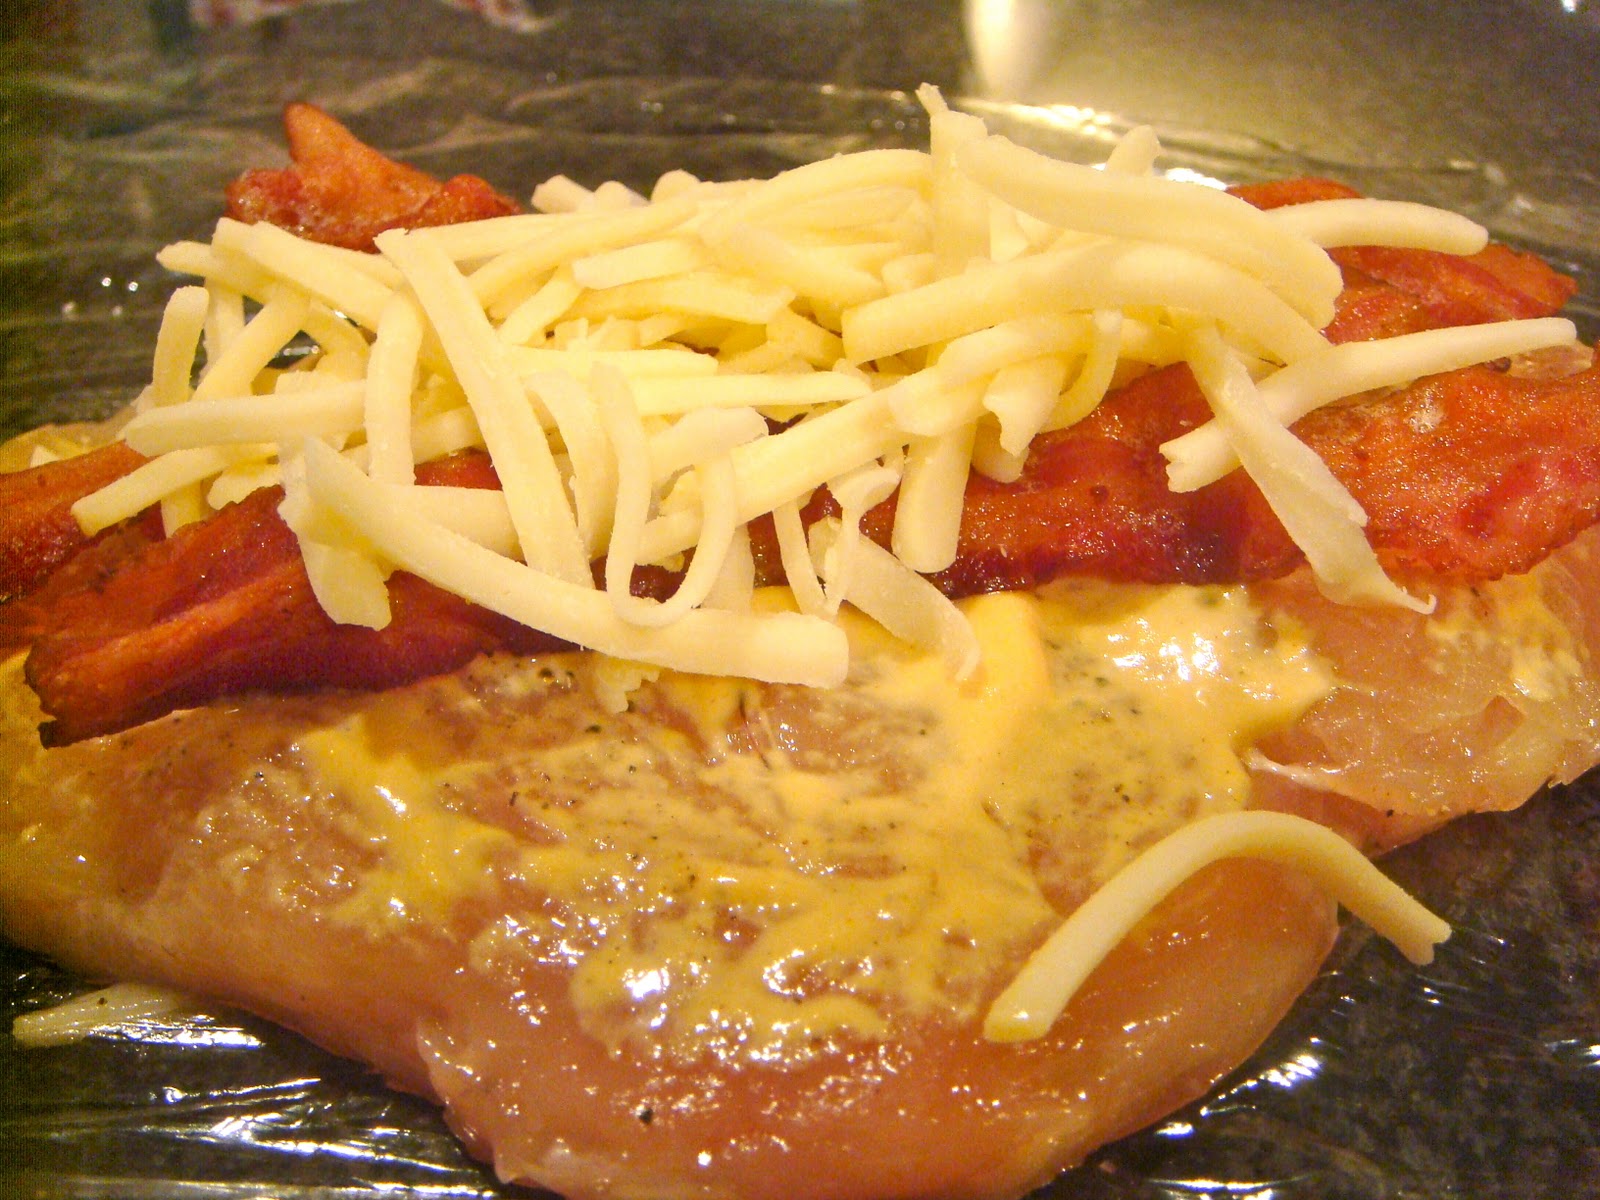
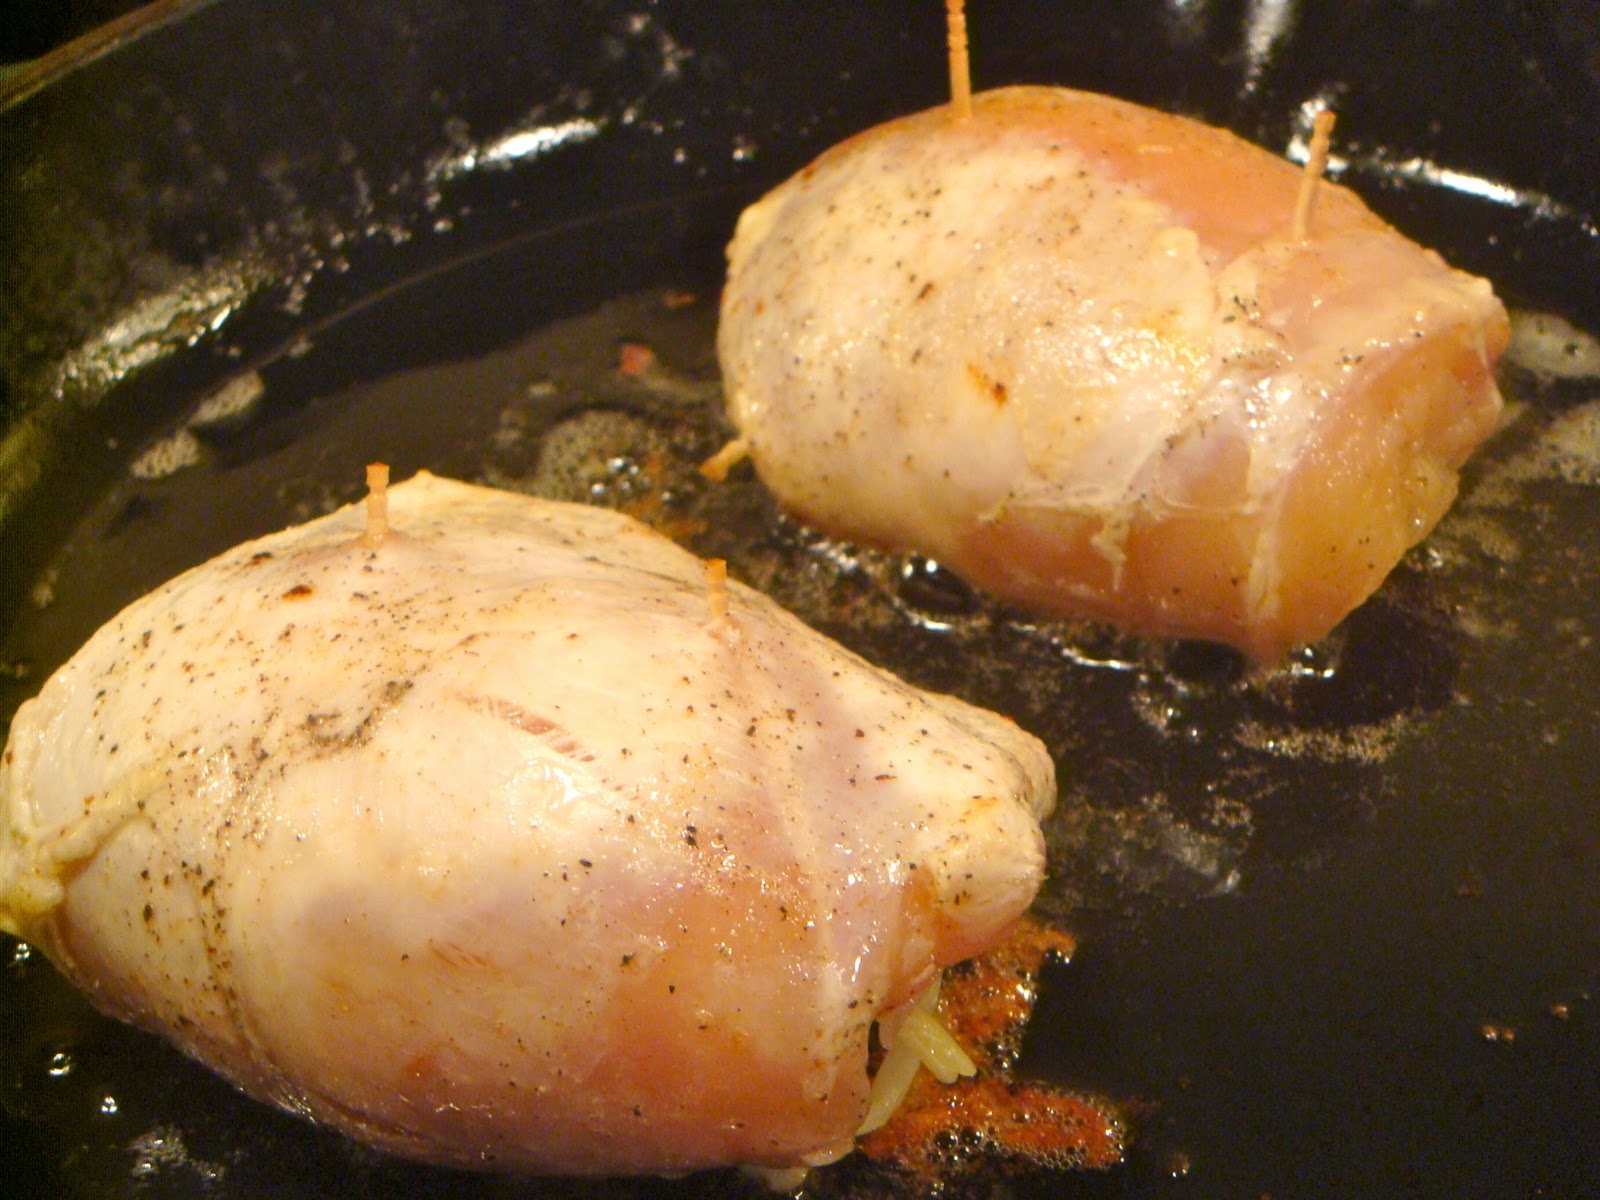
RECIPE: Cheddar and Bacon Stuffed Chicken Breasts
Cheddar and Bacon Stuffed Chicken Breasts

So it’s about the end of the day at work and you’re struggling to come up with ideas of what to make for dinner. Not only that, but you also want to try to deviate away from the norm and let your taste buds reach a new level of extreme tastiness. Here is a recipe that will truly satisfy those taste buds without breaking the wallet and with simple, easy to find ingredients at the grocery store.

Cheddar-And-Bacon-Stuffed Chicken Breasts
Ingredients
1) 6 slices bacon
2) 2 boneless, skinless chicken breasts
3) Salt and pepper
4) 2 teaspoons Dijon mustard, if desired
5) 1/4 cup grated cheddar cheese
Preparation
Preheat oven to 300 degrees.
Cook bacon on stove in oven-safe skillet until cooked but not crisp. Transfer to a paper towel-lined plate.

Flatten chicken breasts to about 1/4- to 1/8-inch thickness, and lightly season with salt and pepper.
Spread a teaspoon of Dijon mustard on each chicken breast, if desired.

Lay three pieces of bacon on each chicken breast, and top the bacon with the cheddar cheese.
Roll up each chicken breast, being careful to keep the bacon and cheddar tucked inside, and secure each with toothpicks.

Place the chicken rollups back in the pan with bacon grease and cook on the stove over medium heat, turning frequently, just to brown all sides.
Transfer the pan to the oven, and bake for 25 to 30 minutes, until chicken is cooked through. Feel free to baste the chicken with some of the bacon grease while it’s baking. (I warned you this was not diet food.)

Serve hot, preferably with some of these pretzel rolls.

The Cheese Report Card: A Guide to the Best Cheeses
Though high in saturated fats, it provides many essential nutrients including protein, vitamin D and zinc as well as calcium.
Here’s a round-up of your favourite cheeses and how healthy they are. All figures are based on a healthy portion size of 30 grams (a matchbox-size chunk).
- Swiss
120 calories, 9 g fat, 290 mg calciumVery high protein, with a matching high-mineral content. A 30g portion of Emmenthal provides more than a third of the Recommended Daily Allowance (RDA) of calcium and nearly a tenth of the RDA for zinc – essential for healthy skin, reproductive health and the immune system.Health score: 8/10

Brie
96 calories, 8 g fat, 162 mg calciumMost people assume it is one of the fattiest cheeses, but it has lower levels than cheddar or stilton and a good quantity of calcium. It is also a reasonable source of zinc and the rind is rich in vitamin B1 – essential for cells to release energy.
Health score: 6/10
Camembert
89 calories, 7 g fat, 105 mg calcium
Camembert has a third less fat and a quarter fewer calories than hard cheeses. It is high in folic acid which the body needs to make red blood cells, though pregnant women (who need a higher intake of folic acid) should avoid Camembert.
Health score: 5/10

Parmesan
136 calories, 9.8 g fat, 360 mg calcium
Extremely high in calcium, just a tablespoon of Parmesan grated over pasta supplies 15 per cent of the RDA. It is also the best cheese for zinc, although it is high in salt.Health score: 9/10
Cottage Cheese
29 calories, 1.2 g fat, 22 mg calcium
This is the only truly low-fat cheese, making it ideal for slimmers. But the downside is a low calcium content, which reduces its nutritional rating compared with other cheeses.
Health score: 5/10
.jpg)
Cheddar
124 calories, 10.3 g fat, 216 mg calcium
One of the highest-fat cheeses, but it’s also a good source of calcium and zinc. A national favourite, nonetheless.Health score: 6/10
Half-fat cheddar
78 calories, 4.5 g fat, 252 mg calcium
Also higher in protein, calcium and zinc than normal cheddar. But on the downside, it’s a bit lower in vitamins A and D.Health score: 9/10
Cream cheese
132 calories, 14.2 g fat, 29 mg calcium
The unhealthiest cheese as it is close to 50 per cent pure fat and has only a fraction of the calcium content of many hard cheeses.
Health score: 2/10
Edam
100 calories, 7.6 g fat, 231 mg calcium
Contains a medium amount of fat, is rich in calcium, but high in salt so is not advisable for high blood pressure sufferers.
Health score: 8/10

Goat’s cheese
59 calories, 4.7 g fat, 57 mg calcium
Low in calories and richer in vitamin D (an important bone-strengthener) compared with cow’s milk cheeses, although it is not a great source of calcium or zinc.
Health score: 6/10
Processed cheese slices
78 calories, 5.6 g fat, 213 mg calcium
Rich in calcium and lower in unhealthy saturated fats than unprocessed cheese. Gets its dubious ‘plastic appeal’ from added milk proteins, modified starch, preservatives and emulsifiers.
Health score: 6/10Feta
75 calories, 6 g fat, 108 mg calcium
Made with sheep’s milk, it has a moderate amount of calcium and fewer calories than half-fat cheddar. Feta is also a better source of vitamin D than cow’s milk cheese, but is also the saltiest variety – a 30g portion has a fifth of the daily guideline intake for women.
Health score: 7/10

Mozzarella
90 calories, 7.5 g fat, 155 mg calciumA medium-fat cheese which can be disproportionately high in unhealthy saturates. However, it has a good calcium content.
Health score: 7/10
Ricotta
56 calories, 4.4 g fat, 63 mg calcium
Fairly low in fat and salt, and contains low to medium amounts of calcium.Health score: 7/10
Stilton
123 calories, 10.7 g fat, 96 mg calcium
Similar to cheddar in fat and calories, but has a much lower calcium content. It is high in folic acid, though, like all blue-veined cheese, it is not suitable for pregnant women as it carries a listeria risk.
Health score: 4/10
Be sure to stop by Shisler’s Cheese House to pick up your supply of healthy cheeses or order online here!
The Art of Cooking Amazing Bacon, A Masterpiece!
Bacon Cooking Tips
If the packaged sliced bacon is refrigerator-cold, slowly slide the dull edge of a butter knife along the length between the strips, gently rocking to separate slices. Plan ahead and take the bacon out of the refrigerator thirty minutes before cooking. The slices should separate easily.
When frying bacon, it’s important to keep a close eye on it and turn it often. It can burn in the blink of an eye. Older bacon will cook and burn almost twice as quickly as fresh bacon.
If you prefer very crispy bacon, choose thinner slices to fry up. Pour or baste off the fat as it accumulates in the pan. Use medium to medium-low heat. Cook slowly, turning often, to render out the most fat and help reduce shrinkage.
Pricking with a fork will help alleviate any curling problems. Drain breakfast bacon on paper towels.
The fat rendered from the cooked bacon is highly-prized as cooking oil for its flavor. After cooking the bacon, cool the rendered oil to room temperature and then pour through a fine sieve into a glass container. Cover and store in the refrigerator or freezer for future use. If you do not need the rendered fat, let it cool to room temperature, pour it into a disposable metal or glass container, seal, tie it up in a plastic bag, and toss it into the trash. It’s not wise to pour it down the drain, because it will coagulate and clog up the drain.
There are fancy microwave bacon cookers on the market which work well, but they are not necessary. Place a microwave-safe paper towel in a micro dish large enough to fit a single layer of bacon slices (4 to 6 slices). Cover with another paper towel. Six slices should take about 4 to 5 minutes on high, depending on the wattage of your microwave and the thickness of the bacon. Start checking after the first two minutes, and continue cooking at one minute intervals until you can judge the cooking time for the way you like it.
Consult your microwave manual for more specific times. A rotating base in the microwave is highly recommended for even cooking, and most come with one built-in these days. Remember that foods continue to cook even after the timer goes off in a microwave, so let it rest a few minutes before you dive in to let it crisp up and avoid burns. Curly bacon never bothers me, but this method reduces curling of the bacon.
Bacon can also be easily baked in the oven, resulting in amazingly flat slices. Preheat oven to 400 degrees F. Place a rack inside a baking sheet. Lay out slices and bake for 10 to 15 minutes, depending on desired doneness level. Voila! Crispy bacon with no curls. You can also use your broiler, but I don’t recommend it. First of all, the splatters not only make a royal mess, but also cause flares. Secondly, it requires much more attention. Stick with frying, microwaving or baking.
How can you reduce splattering problems? Part of the problem arises from today’s quick salt-brining method (known as pickle-curing) used by producers. The liquid naturally soaks into the meat, and you know what happens when liquid hits hot oil — snap, crackle, pop! Be sure the bacon slices are cold from the refrigerator and start with a cold pan. Use medium to medium-low heat and take your time cooking the slices, turning often. It’s preferable to thaw frozen bacon in the refrigerator to reduce moisture, but even then some of the moisture may naturally seep out. Towel off the slices before cooking to avoid excess splattering.
If you must watch your fat intake, lean smoked ham or prosciutto can be substituted in many recipes where the rendered bacon fat is not needed. Turkey, chicken and vegetarian bacon products are also available.
Most slab bacon is sold with the rind attached. Remove the rind before using. Render the fat from the rind by frying and you have cracklings, a favorite Southern snack.
At Shisler’s Cheese House, we carry an amazing inventory of Streb’s Meats Smoked Bacon. Be stop by our store and pick some up today!
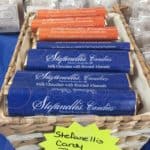
We Now Have Sponge Candy and More Chocolate Delights!
Shisler’s Cheese House now has Sponge Candy! Among this decadent, melt-in-your-mouth chocolate treat, we have a wide assortment of new chocolates by Stefanelli’s Candies including chocolate covered potato chips, chocolate covered pretzels, milk chocolate bars with a caramel center and milk chocolate bars with roasted almonds. Be sure to stop by and pick some up today!

What is Sponge Candy?
Sponge candy is one of our incredible discoveries brought to us by a customer recommendation. It’s made from sea-foam toffee covered in rich milk or dark chocolate that just melts in your mouth. The premium variety of sponge candy has been made with love by Stefanelli’s Candies of Erie, PA since 1929 and we are proud to offer it to you once again! Be warned, though, as sponge candy is highly addictive!
Among our selection of irresistible Sponge Candy, we now carry a wide assortment of other chocolate goodies, including Chocolate Covered Potato Chips, Chocolate Covered Pretzels, Almond Toffee Crunch and Milk Chocolate Bars with Caramel and Roasted Almond fillings.


Stop by Shisler’s Cheese House today and bring some of these delightful treats to your home! Once you open a bag of Sponge Candy, the angels of heaven will sing as the prepare you for your best chocolate experience yet!
Goat Cheese: Promoting a Healthier You!
Do you love cheese but feel guilty of calories every time you have some? Do you often feel how great would it be if only you could have the best cheese in the world, which is both tastier and low in calories? Well, there is some good news for you. There is goat cheese, which is exactly the kind of cheese you want! And what’s more is that Goat cheese comes with a host of health benefits!
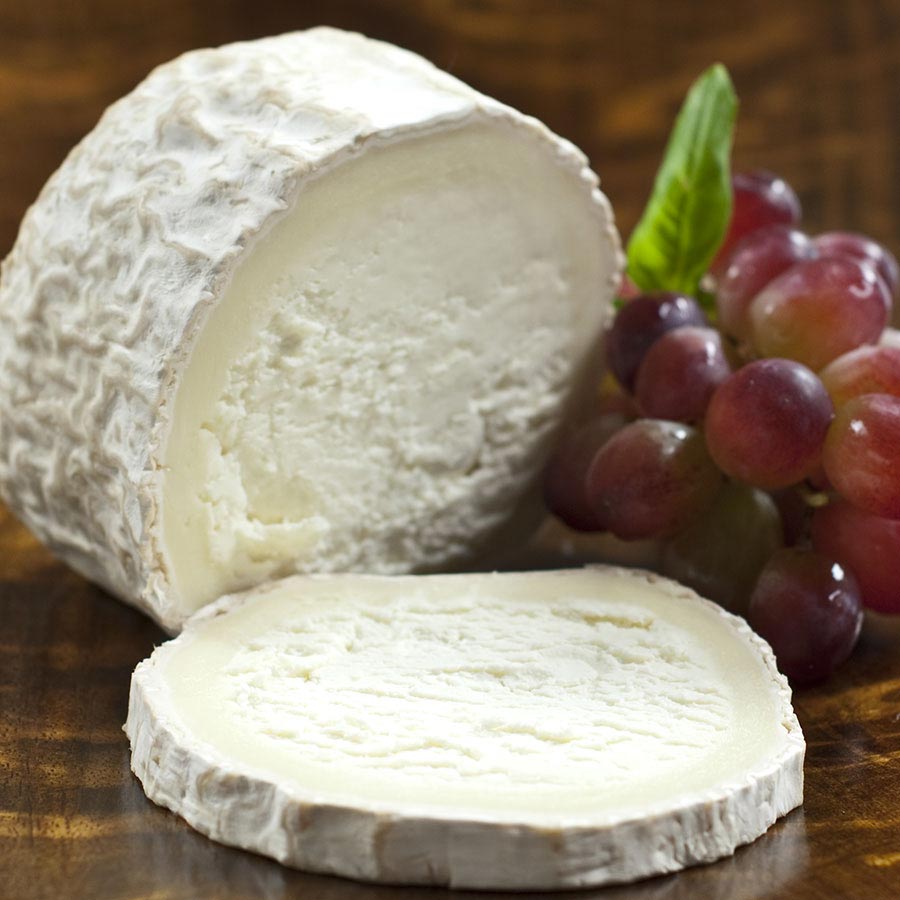
Goat Cheese: A Brief
Goat cheese is made from goat milk and is available in soft and hard forms like other cheese. It is healthier and better for you than the cheese made from cow milk. Apart from having more nutrients than other forms of cheese, there are many health benefits of goat cheese which are listed below!

1. Low Fat:
Goat cheese is a low-fat alternative to regular cheese. It contains lesser amounts of fat than other cheese forms, and replacing your regular cheese with goat cheese can help you reduce the amount of saturated fat and cholesterol in your diet. Goat cheese contains just a little more than half the amount of fat than regular cheese. And coming to saturated fat, goat cheese contains only half of the same found in regular cheese.
2. Fewer Calories:
Goat cheese contains fewer calories than any other form of cheese made using cow milk. Ideally, if you substitute cheddar with goat cheese, you will be effectively reducing 200-300 calories from your diet.
3. Good For Lactose Intolerant People:
Goat milk contains significantly lower amounts of lactose than regular milk. Lactose is usually lost when cheese is churned, and goat cheese thus contains an exceptionally low amount of lactose. This makes it the ideal cheese for people who suffer from lactose intolerance.
4. Low Sodium:
Goat cheese contains less than half of the amount of sodium than regular cheese. Excess sodium can lead to chronic conditions and potentially fatal diseases like heart attack and even stroke. Usually, doctors recommend we have no more than 2,300 mg of sodium daily. If you are someone who cannot resist the cheese, you might want to switch to goat cheese.
5. Sufficient Protein:
Goat cheese is not as rich as regular cheese in terms of protein content, but it does provide a decent amount of the nutrient, which is enough for the proper functioning of the body. Goat cheese usually contains slightly more than half of the protein level as cheddar cheese. Doctors usually recommend women to consume 46 g of protein, while men should ideally consume 56 g of protein every day.
6. Rich In Vitamins And Minerals:
Goat cheese contains more minerals and vitamins than cow cheese. It is especially rich in Vitamin D and Vitamin K, while also containing the same amount of vitamin A as cow cheese. Goat cheese is also high in B vitamins like thiamine, niacin and riboflavin. Riboflavin is an essential vitamin that helps promote tissue health. As your body does not produce these essential vitamins and minerals on their own, goat cheese can provide a steady source of these essential vitamins.
7. Calcium-Rich:
Goat cheese is especially rich in calcium, with greater calcium concentrations than cow cheese. Calcium is especially important for the body, helping strengthen bones and teeth as well as protecting you from diseases. Calcium has many benefits for the human body.
So, now that you know about the amazing health benefits of goat cheese, consider replacing your regular cheese with goat cheese. However, remember to buy Goat Cheese from a trusted source, like Shisler’s Cheese House.
Cheese and Chocolate: A Taste of Heaven on Earth!
How to Pair Cheese and… Chocolate?
Who doesn’t love cheese or chocolate? But together? Believe it or not, they’re actually the perfect combination for a tasting!
Cheese and chocolate are so different that the thought of pairing them seems difficult. The key to this type of tasting is keeping it simple. Both are super-rich foods and a little goes a long way. Choose quality over quantity and limit to three to five pairings.
For a great chocolate selection and a wide selection of domestic and imported cheeses, visit Shisler’s Cheese House!

The Art of Tasting
Learning how to taste cheese and chocolate will deepen your appreciation for the foods and makers. Start with your basic senses and expand from there. Be sure both are room temperature before tasting. Remove the cheeses from refrigerator at least 20-35 minutes before the tasters arrive to maximize flavors and aromas. Cold cheese does not release flavors and aromas as quickly and alters the taste.
First, look…
Cheese: Some cheeses are intense in color while others are not. Look at the cheese rind. Is it uniform? Any cracks? Is the cheese dry like a walnut shell or moist like a sliced apple?
Chocolate: For chocolate, color depends on the origin of the beans. Quality chocolate will be shiny, glossy, and have clean edges. Look for bloom or grayish white steaks caused by poor temperature and improper storage.
Second, smell to appreciate…
Cheese: Cheese offers a full spectrum of aromas such as fresh butter, boiled milk, yogurt, fermented hay, nuts, caramel, chocolate, spices, mold and animal (yes, animal!)
Chocolate: There is an incredible array of scents and aromas in chocolate. Milk chocolate aromas may include milk, caramel and malt. Dark chocolate may include nuts, coffee, dried fruits and wine.

Third, taste…
Cheese: Is the cheese dense, compact or light? Is it smooth, grainy or crunchy? The higher the butter fat content, the creamier the mouth feel of the cheese will be.
Chocolate: Never chew chocolate. Chocolate should melt in your mouth. Good chocolate will feel silky and smooth. Subpar chocolate may feel grainy, waxy or greasy to the tongue.

Last, the finish..
.
Allow the cheese and chocolate to linger to fully appreciate the finale of the flavors. The finish is important as many of the early flavors may be masked by other ingredients.
Not all your cheese and chocolate pairings will be a success, but tasting is half the fun. Take your time and try different pairings. Host a cheese and chocolate event, and guide your friends on a delicious journey. Just remember, keep it simple.
The Best Wine and Cheese Pairings
Wine and Cheese

Wine and cheese are two of life’s great culinary pleasures, and finding the perfect match can be a delicious, and at times, a challenging endeavor. But, we are to help! As with any wine and food pairing, there are a number of considerations, such as texture, acidity, fat and tannin. Rather than complicating the topic with exotic matches like Garrotxa and Meursault, we have broken the art of wine and cheese pairing down, so you can create your own.
Wine and Cheese Pairings
The wine-cheese pairing possibilities are endless, but to simplify the strategy, we can divide cheese into four major categories:
Bloomy: Creamy, decadent cheeses, with a soft rind.
Hard: Stiff cheeses, which are often sharp and/or salty. They can also be aged.
Blue: Pungent, often salty cheeses, with a blue tinge.
Fresh: Soft, often spreadable cheeses that can be tangy or mild. They are not usually aged.
If you have a specific cheese in mind, first contemplate the category it belongs to. You can then consult our wine and cheese pairing examples for ideas.
Just as with any food pairing, it helps to think of either complementary or contrasting flavors. A lush wine works well with a triple-cream cheese, while an acidic wine will cut the cheese’s sweetness. As you begin to experiment, taste the cheese first by itself, to get a sense of its character, and then put another bite into your mouth with some wine to see how they mingle. Many experts say that white tends to pair better with cheese, but a light-bodied red and cheese pairing is still possible.
Wine and Cheese Pairing Examples:
| Cheese | Wine |
| Bloomy | |
| Camembert | Champagne |
| Brie | Chardonnay |
| Robiola | Sparkling Wine |
| Taleggio | Pinot Blanc |
| Hard | |
| Gouda | Merlot |
| Cheddar | Cabernet Sauvignon |
| Parmesan | Chianti |
| Double Gloucester | Zinfandel |
| Pecorino | Valpolicella |
| Gruyere | Sauvignon Blanc |
| Fontina | Bardolino |
| Blue | |
| Gorgonzola | Port |
| Stilton | Sauternes |
| Blue | Riesling |
| Cambozola | Eiswein |
| Fresh | |
| Ricotta | Pinot Grigio |
| Mozzarella | Sauvignon Blanc |
| Goat | Chenin Blanc |
| Feta | Beaujolais |
| Burrata | Tocai Friulano |

Preparing a Wine and Cheese Party
What better way to taste a variety of pairings then to throw a wine and cheese party? Purchase a few different cheeses from a cheese shop or gourmet store with a well-equipped storage facility. Discuss your plans with the cheesemonger and ask for recommendations. You can get creative with cheese place cards or purchase a nifty slate cheese tray, which allow you to etch cheese names in chalk. Lastly, be sure to serve the wine and cheese at their proper temperatures, so their flavors can emerge. Serve white wine at 45°F, red wine at 60°F and remove the cheese from the refrigerator 30 to 60 minutes prior to serving.
Wine and Cheese Party Menu
A great wine and cheese party offers pairing selections with varied flavor profiles. Display the options in a circle and have your guests start with lighter wines and fresher cheeses and move clockwise toward the ones that have sharpness and depth. To simplify, you could also choose a flexible wine that pairs with a wide range of cheeses. A lean red, such as Gamay or Pinot Noir, could serve as a perfect starting point. Your guests can taste that wine with each cheese and then rank the pairings.
Let Shisler’s Cheese House help with your wine and cheese party needs with our vast assortment of domestic and imported cheeses!
Amazing Recipes To Satisfy Your Hunger For Cheese
Something warm for lunch: straight-from-the-oven ham and cheese turnovers.

INGREDIENTS
- 1 1-pound package refrigerated pizza dough
- 8 ounces deli ham, thinly sliced
- 4 ounces Swiss cheese, thinly sliced
- 1/2yellow onion, cut into thin rings
- 2 teaspoons whole-grain mustard
- 2 tablespoons extra-virgin olive oil
- 1 small head romaine, torn into pieces
- Heat oven to 400° F. Roll the pizza dough into a 14-inch circle and cut into 8 triangles.
- Stack a slice of ham and cheese and some onion on the bottom of each triangle and roll the dough up around the filling. (Some will stick out the ends.)
- Transfer the rolls to a parchment-lined baking sheet. Bake until golden and crisp, about 20 minutes.
- Combine the mustard and oil in a medium bowl and toss with the romaine. Serve with the turnovers.
Cheddar cheese and horseradish give an ordinary roast beef wrap some bite.

INGREDIENTS
- 4 ounces cream cheese, softened
- 2 tablespoons prepared horseradish
- 4 large flour tortillas
- 1 head romaine lettuce, tough ribs removed
- 8 ounces thinly sliced deli roast beef
- 4 ounces Cheddar, thinly sliced
DIRECTIONS
- In a small bowl, combine the cream cheese and horseradish. Spread evenly over each tortilla.
- Layer the tortillas with the lettuce, roast beef, and Cheddar and roll up.
Try these on a cold winter Sunday: red pepper–flaked scones made with buttermilk and Swiss cheese.
Crispy tacos get a fresh mix of pinto beans and Cheddar.

INGREDIENTS
- 1 15-ounce can pinto beans, rinsed
- 3/4 cup mild salsa
- 1 heart of romaine
- 8 taco shells
- 1 cup shredded Cheddar
DIRECTIONS
- In a small microwave-proof bowl, combine the beans and ½ cup of the salsa. Microwave on high until hot, 1 to 2 minutes.
- Tear the lettuce into bite-size pieces.
- Divide the taco shells among 4 plates. Divide the bean mixture among the taco shells and top with the lettuce, Cheddar, and remaining ¼ cup of salsa.
Swiss cheese, eggs, and prosciutto are sandwiched together in a crisp, golden Panini.

INGREDIENTS
- 8 large eggs
- kosher salt and black pepper
- 2 tablespoons unsalted butter
- 4 soft rolls, halved lengthwise
- 8 ounces prosciutto, thinly sliced
- 8 ounces Swiss cheese, thinly sliced
DIRECTIONS
- In a small bowl, whisk together the eggs, ½ teaspoon salt, and ¼ teaspoon pepper.
- Melt 1 tablespoon of the butter in a large nonstick skillet over medium heat. Pour in the eggs and scramble until cooked through.
- Divide the eggs among the bottom halves of the rolls. Top with the prosciutto and cheese and sandwich with the tops of the rolls.
- Melt the remaining tablespoon of butter in a grill pan or large nonstick skillet over medium heat. Place two sandwiches in the pan.
- Cook, pressing often with a spatula or placing a pan on top to weigh down the sandwiches, until cheese has melted and bread is golden, 4 to 6 minutes.
- Repeat with the remaining sandwiches.
Monterey Jack melts into scrambled eggs spiced with salsa.

INGREDIENTS
- 1 1/2 tablespoons unsalted butter
- 10 eggs
- 2 tablespoons milk or water
- 1 teaspoon kosher salt
- 1/4 teaspoon freshly ground black pepper
- 1 cup shredded Monterey jack cheese
- 3/4 cup salsa (drained)
- 1 cup crushed tortilla chips
DIRECTIONS
- Heat butter in a large nonstick skillet over medium heat.
- Meanwhile, in a large bowl, whisk together the eggs, milk, 1 teaspoon kosher salt, and 1/4 teaspoon pepper. Pour into the pan and cook, stirring occasionally, to desired doneness, 4 to 5 minutes, adding cheese just before they’re set. Fold in salsa and chips.
This tangy, oozy dish is loaded with Swiss cheese.

INGREDIENTS
- 3 eggs
- 3 cups buttermilk
- 1 tablespoon fresh thyme leaves
- 2 teaspoons kosher salt
- 1/8 teaspoon freshly ground pepper
- 2 pounds baking potatoes, peeled and cut into 1/8-inch slices
- 2 pounds Granny Smith apples (unpeeled), cut into 1/8-inch slices
- 1 pound Swiss cheese, shredded
- 1/4 pound Parmesan, grated
DIRECTIONS
- Heat oven to 400° F.
- Coat a 3 1/2-quart casserole with cooking spray. In a medium bowl, whisk together the eggs, buttermilk, thyme, salt, and pepper; set aside.
- Arrange a layer of slightly overlapping potatoes in the casserole. Cover with a layer of apples and sprinkle with a third of each cheese. Pour a third of the egg mixture on top. Make 2 more layers.
- Bake, covered, 1 hour, 15 minutes. Remove cover and bake another 15 minutes or until the potatoes are tender. Remove from oven. Serve warm or at room temperature.
Everything but the kitchen sink goes into quesadillas finished off with Cheddar or Monterey Jack.

INGREDIENTS
- 1 15.5-ounce can black beans, drained
- 1 11-ounce can corn kernels, drained
- 3/4 cup salsa, drained
- 18-count package large flour tortillas
- 1 1/2 cups (6 ounces) shredded Cheddar or Monterey Jack
- 1 small red onion, thinly sliced
- 1/3 cup fresh cilantro leaves
- 1/2 teaspoon kosher salt
- 1/4 teaspoon black pepper
- juice of 1 to 2 limes
- 2 tablespoons extra-virgin olive oil
- 1 head romaine lettuce, sliced 1 inch thick
DIRECTIONS
- Heat oven to 400° F. In a medium bowl, combine the beans, corn, and salsa. Place 4 tortillas on a parchment- or foil-lined baking sheet.
- Sprinkle the tortillas with half the cheese. Using a slotted spoon, top with the bean mixture. Sprinkle with the remaining cheese; top with the remaining tortillas.
- Bake the quesadillas until the cheese has melted, 5 to 7 minutes. Transfer to a cutting board.
- Meanwhile, in a large bowl, combine the onion, cilantro, salt, pepper, lime juice, and oil. Add the lettuce and toss.
- Cut each quesadilla into 6 wedges. Serve with the salad.
SPECIAL EDITION: Mother’s Day Gift Ideas
What better way to show mom you care this Mother’s Day than with a homemade gift from the heart? A gift with a personal touch, a gift that has your love embedded into the materials, because you made it! With the big day just 48 hours away, Martha Stewart shares some last-minute DIY gift ideas mom will love.Martha Stewart shows how to make DIY gifts for Mother’s Day
Splattered pom pom flowers

Sick of spending money on flowers? Try Martha’s Splattered Pom Pom Flowers, and since they are made from tissue paper, you can enjoy them well past Mother’s Day!
Materials: Tissue paper, pipe cleaners, floral tape, fringing scissors and regular scissors, craft paint, spray bottle
Steps:
1. Do a 1-inch accordion fold on three layers of white tissue paper (size 6×20″).
2. Wrap a pipe cleaner around center of folded paper to create a stem.
3, Cut each edge in a pointed or rounded shape (depending on what you want flower petals to look like).
4. Open the folds and carefully separate the three paper layers to create flower.
5. Spritz with water/paint mix and let dry for a few hours.
Heart shadow box

Make your own shadow box using a standard picture frame so mom has a keepsake — it can be used to display your child’s artwork, or showcase a special poem or mom’s favorite quote.
Materials: Craft paint, small paint brushes, picture frame, paper and scissors to make a heart shape, your child’s artwork or a copy of mom’s favorite poem or quotation
Steps:
1. Carefully remove glass pane from the frame.
2. Cut a simple heart template out of paper as a guide. Center the heart template on the glass pane and start tracing the outer edges of the heart with your Large Brush and Craft Paint.
3. Continue to fill in the first layer from the heart outline, out toward the edges of the glass pane. Let dry completely.
4. Apply a second coat of paint. If needed, apply another coat until you end up with an opaque “shadow” box.
5. Use this to frame your favorite artwork from your kids or poem!
Personalized decoupage trays

What mom doesn’t like breakfast in bed? Why not surprise mom not only with homemade meal, but also a personalized serving tray she can keep for years to come. Just print out your favorite photos, cut out paper hearts or pretty pictures from magazines for decoration.
Materials: Tray, decoupage finish, paintbrush, cutout hearts, photos or magazine clippings
Steps:
1. Wipe tray clean with a damp cloth. Let dry.
2. Collect photos of flowers from magazines or print out clip art or personal photos. Arrange placement on tray.
3. Paint decoupage finish onto back of a printout. Paste onto tray. Repeat for each cutout. Let dry, one to two hours.
4. Paint entire tray with decoupage finish. Let dry one to two hours. Then add a topcoat for extra durability.
Smoothie bar

Don’t want to do breakfast in bed? No problem, when mom wakes up, surprise her with a smoothie bar set on the kitchen counter. She can choose her own ingredients.
Materials: Blender, glasses, platter or bowls
Ingredients for your bar:
- 1 cup fresh or frozen pineapple, cut into 1-inch pieces
- 1 cup frozen blueberries
- 1 cup frozen strawberries
- 1 cup frozen raspberries
- Fresh ginger, unpeeled
- Bowl of low-fat plain yogurt
- Pineapple juice
- Plain Kifer (or your favorite kind of milk)
- Honey
- Handful of mint
- Bowl of ice
Instructions: Blend favorite ingredients in blender then pour into a glass for tasting.
From Shisler’s Cheese House to your house, wishing all the mothers out there a very happy and enjoyable Mother’s Day and the same to all the dads pulling double duty and doing a tremendous job at it!


