Tag: shisler’s cheese house
Cheesemaking: How To Make Derby Cheese With Sage
This cheese is a Derbyshire cheese that was created during the early 20th century. It is a moister, softer and earlier ripening version of Cheddar. Sage is added to this recipe to give it a delicious twist.
Recipe

What To Do
2 Gallons of Milk (Not UltraPasteurized)
2/3-3/4 Packet C101 Mesophilic Culture or 3/16 tsp MA11 Culture*
1/2 Tsp (2.5 ml) Single Strength Liquid Rennet
0.8 oz Salt
6-12 Sage Leaves for Aroma/Flavor
6-12 Spinach Leaves for Color
Calcium Chloride (for pasteurized milk)
What To Do
1. The first step is to heat and acidify the milk. So let’s begin by heating the milk to 84F. To do this, place the milk in a container and then place it in a large pot of very warm water. If you heat it on the stove, be sure to heat it slowly and stir it as it heats if you heat it on the stove.
Once you are done heating the milk, you can add the culture. The powder can become very cakey and sink in clumps so to prevent this, sprinkle the culture over the surface of the milk and then let it sit for a couple of minutes. This allows the powder to re-hydrate before you stir it in. After stirring, let the milk sit for a further hour so that the culture can get to work.
2. While you are waiting for the milk to warm and ripen, you should begin preparing the sage.
– Clean the leaves well in cold water and let them soak for 10-20 minutes. This can help remove some of the herbal bitterness.
– Make sure you drain the leaves well and then add around 2-4oz. of cold water and blend the herbs into a fine puree.
– Now set the puree aside for later use. The puree should be dark green once the foam subsides.
3. After an hour of ripening, add in the single strength liquid rennet. Stir the rennet in for about a minute in a slow up and down motion. The rennet will begin to coagulate the curd, let it sit for another hour. You will see the milk thicken after around 20 minutes, but it still needs the full hour for a proper curd to form.
One way to check for a good card, insert a knife into the curd at a 45-degree angle and lift slowly until the curd breaks. The edges should break cleanly and the whey that will rise should be clear, not cloudy.
Remember to utilize coagulation times by sanitizing the cheese molds and draining boards.
Once the curd is firm, you can begin to cut it into 1/2-5/8 inch pieces as evenly as possible, using a knife to make vertical cuts.
Stir the curds gently enough to keep them separated for about 5 minutes. This will allow for the curd surface to harden enough for a long stir. Make sure you allow the curds to settle for about another 5 minutes to allow the whey to rise.
Begin to stir the curds consistently for the next 15 minutes and bring the temperature back up to 84F if it has dropped.
The curds will appear to be soft and show very little structure, while the whey may be opaque.
4. You can now begin to dry out the curds. This can be done by increasing the heat slowly to 92F. You need to increase the temperature at the rate of 3-5F per 5 minutes at the beginning, making the total cooking time 15 minutes, but may be extended if the curds are still soft.
The curds will become firmer and the whey will appear more translucent.
You should examine the curds to make sure enough moisture has been removed. Broken curds should be firm throughout and the curds should be firm throughout and the curds should have a moderate resistance when pressed between the fingers.
The curd is ready when a handful of curds pressed together easily separate with a little pressure from the thumb. At this point, the curds can be allowed to settle under the whey.
5. The whey should first be removed to the curd surface in the vat. You can transfer the curds to a colander lined with butter muslin. Allow them to be drained for a few minutes, gently stirring the curds will make sure the whey drains off.
6. Once you have released all the free whey, fold the drainage cloth over and turn the cheese mass to allow it to consolidate. Then place another identical tub with no holes on top and add 1/2-3/4 gallons of water. This is to keep the curd warm and to help with consolidating the curd mass.
At this point, the final acidity has developed and some calcium will be leached from the curd and flow off into the whey. The structure of the curd will also begin to change.
Unwrap the cheese mass and turn it over and rewrap every 15-30 minutes for the next 1-2 hours while final acid is produced. The final acid being pH=5.3-5.4 TA%=.45-.55 and more whey is expelled. The longer you let the curd develop, the more it is turned and the drier it will become.
Once the curd has ripened, you should see a change in its structure. It will be well consolidated and flatter. When you break it, you should see an elongated individual curd profile.
7. Now the curd should be torn or cut into small walnut sized pieces. This will allow for the salt to penetrate to the center of each curd and stops the development of excess acid which is already near its targeted development. Failing to do this will result in an over acid cheese.
8. This next step is about adding the salt and sage to the curd. About 2% of the curd weight in salt should be added. The final curd weight of 2.5lbs will need around .8oz of salt. Add the salt in 2-3 cycles, with time between for the salt to dissolve.
Once the salt is absorbed, you can add the sage/spinach infusion to the broken curds. This should now have dropped to room temp and will be cooler than the curds. This will cause more of the sage liquid infusion to be absorbed into the curds. It is essential to add the salt before the sage infusion because the whey released from salt additions will cause some of the sage flavor to be released as well.
Stir the sage infusion well into the curds and allow them to rest for a few minutes while you prepare the mold.
9. Make sure the mold and cloth have been sanitized. The curd can be pressed into the mold and compacted with a firm hand to begin the consolidation.
Fold the cloth over the surface and the follower placed on top so that the press weight is on the cheese surface and not in the mold itself.
10. This is the stage where you begin pressing the cheese. To press the cheese, begin very light and then slowly increase the press weight to a moderate level:
– 30 minutes at 15 lbs
– 60 minutes at 20 lbs
– 2 hours at 35 lbs
– Overnight at 40-50lbs
After the initial drainage of whey, the rate of whey running off will be a matter of drops and not a stream of whey being released. This is a good rate of whey removal during pressing and will slow down even more as the residual free moisture is released. You should see tears of whey weeping from the form very slowly. When it stops completely, increase the weight slightly.
Remove the cheese from the press and unwrap, turn and rewrap and put it back into the press at the above intervals to assure an even consolidation.
11. Now it is time to age the cheese. You can place it into the aging room at 52-56F and 80-85% moisture. Age the cheese for around 4-6 weeks, after this time, the cheese will be ready for serving. Or you can leave for a further 3-6 month for a complex aged texture and flavor.
Cheesemaking: How To Make Robiola Cheese
Robiola is a perfect cheese for a home cheesemaker. It is produced in the Langhe Hills just south of Torino, Italy.
Recipe

What You Need
1 gallon of milk
1 packet of our Buttermilk culture
Liquid Rennet (either animal or vegetable)
Salt
A good thermometer
A knife to cut the curds, and a spoon or ladle to stir the curds with.
2-3 of our BasketMold (M332) to drain the curds
Butter Muslin for lining the molds and draining
Calcium Chloride can be added for pasteurized cold stored milk and will help to form a firmer curd using about 1/8-1/4 Tsp per gallon of milk.
What To Do
1. First, you need to heat the milk to 72F. You can place this in a pot in a sink of warm water or heat it on the stove. Be sure to heat it slowly and stir it as it heats if you heat it on the stove.
Once you have heated the milk, add the culture by sprinkling it on the surface to avoid it caking and clumping. Let it sit for 2 minutes so that the powder can re-hydrate before stirring it in.
Now let the milk sit for 4 hours while the initial acid develops before adding the rennet. The longer you let it ripen, it will cause the rennet to work on the milk much quicker due to the higher acid.
2. Once the milk has developed acid, you will add about 4 drops of single strength liquid rennet and stir for 1 minute.
To allow the rennet to do its work and coagulate the curd, allow the milk to sit for 25-40 minutes. After this, you will find that the milk has thickened and may hold a good cut as shown at left but do not worry if it still seems very soft. Don’t cut the curd though. Let the milk sit for another 8-24 hours.
When you see this whey rising, you can be sure that the curd has developed enough acid to be briefly cut and ladled to the forms.
3. The curd is ready to be cut and release the first of the whey. Begin with making a larger 1.5″ vertical cross cut with the knife and then let it sit for 3-5 minutes so that the whey can be released and become slightly firmer. You can make another cut using a spoon and cross cutting to break the curds into bean sized prices or a bit larger. Remember the larger the cut, the moister the final cheese.
When you’ve made the final cut, the curds can be stirred for about 5-10 minutes to allow the curd pieces to firm up. You can let the curds settle while you prepare the molds and draining cloth.
Use a spoon to remove the whey down to the level of the curds.
4. The moist curd can now be transferred to a mold lined with butter muslin. Set the molds on a rack above a sink to catch the whey as it drains. You can use the whey for other things during baking.
Once you have transferred all the curds to the molds, place a cloth over the top and turn the cheese in the form to encourage a nice even surface.
After around 5-10 minutes, the cheese will be firm enough to be handled. Lift the cheese from the cloth and turn onto the cloth in a basket and re-wrap. Allow this to drain for another 45-60 minutes.
The cheese will be well firmed after this period. You can remove the cloth from the cheese. The final draining can now commence, taking around 12-18 hours.
After the final draining, the cheese should be floated in a saturated brine for 60 minutes. If the draining isn’t long enough, the acid of the cheese will be too high.
5. When the cheeses are removed from the brine they should be dried off in a cool room for about 4-6 hours. They can then go to the aging space at about 80-85% humidity and 52-58F for at least 4 days. They should be turned daily and wiped with a light brine if mold appears. At the end of this period, they will be ready for the table as a very fresh cheese.
If you continue to wipe with brine every 2-5 days (as needed) to keep the mold growth down, the cheese may ripen for up to 30-40 days. It will change considerably in texture and flavor as the proteins continue to break down.
Cheesemaking: Making Goat’s Cheese With Ash
The cheese that is made in this recipe is a lactic type goat’s milk cheese with a covering of salt and finely powdered charcoal. It will change from black to a nice blue-gray to white and bloomy surface.

Recipe
What You Need
1 Gallon of Goat’s Milk (Not UltraPasteurized)
1 Packet C20G Chevre Culture
1/16 Tsp C8 Penicillium Candidum
2-3 tsp Salt (non-iodized)
1/4-1/2 tsp Charcoal/Ash
Calcium Chloride (for pasteurized milk)
What To Do
1. Firstly, begin by heating the milk to a temperature of 68-72F. If you heat the milk on the stove, make sure you do it slowly and stir it consistently while it heats.
Add the Chevre and P. candidum culture once the milk is at the desired temperature. Sprinkle the powder to prevent it from becoming clumpy and allow it to sit for 2 minutes before stirring it in so it can re-hydrate.
2. There is enough rennet to ensure a proper set. So now let the milk sit for 18-24 hours while the culture gets to work and the rennet coagulates the curd. The thermal mass should keep the milk warm since this is being done at room temperature anyway. It fine if the temperature does drop a few degrees during the time, but find a warmer space if your room is generally cold.
Remember that the longer you let the curd set, the more acid will be produced.
3. Once the curds have been formed, there will be a thin layer of whey over the curd mass and there may be cracks and separation on the sides. You can test with a knife to see if it is ready. It will show a clean break.
You can now move the curds into the molds with a small spoon to allow the whey to drain. You can drain for 8-20 hours at 68-72F. The time amount has a huge range because it is all dependent on what you want for moisture in your final cheese. This means less time for a sweeter and moister cheese or more time for a drier and tangier cheese.
Note that the bacteria is still working and as long as the whey is present it is able to convert the lactose to lactic acid.
4. To add the ash, you simply need to dust a thin layer of charcoal with no salt after filling the molds about 2/3rds full and then add the rest of the curds.
Once the mold stops dripping whey, it should be firm enough to unmold.
5. The cheese is now ready to be salted. You can mix the charcoal and the salt together. The ratio which is best can be anywhere from 1:5 to 1:8 charcoal to salt ratio, depending on how heavy an ash surface you want on the cheese.
The base salt amount should be about 1 Tsp per cheese and you can apply this by sprinkling about 1/2 per surface. You can even it all out with your hand and spread slightly down the sides. Wait until the salt dissolves and soaks into the cheese body before you salt the other side.
After the salt has been absorbed and no whey drips from the cheese, the cheese can be taken to a space for drying. We are looking for the surface moisture to dry down so that no bright moisture spots can be felt or seen and the surface takes on a matte appearance. This can be done in a room at around 60F with 65-70% moisture. You should place a reed mat or plastic mat under the cheese to allow air movement.
6. Once you have dried the cheese out, it can go to the aging space at 52-56F and 90-95% moisture. This is where it will undergo the final ripening, but must be turned daily to even the moisture and keep the mold from growing into the mats.
After 3 days, you will already see signs of white mold on the surface changing from black to a dusty gray.
After 5 days you will see a full coat develop as the surface becomes light gray as shown in the photo. You would usually see this after 2 weeks when not using charcoal.
After 8-12 days the cheese can be cut as fresh or can be held for several weeks as the surface enzymes continue to work on the proteins, leading to a more complex flavor.
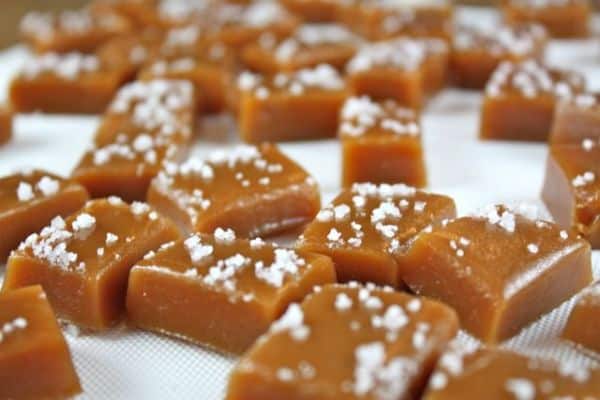
Fleur de Sel Soft Caramels
Salt is becoming more popular by the day to accompany chocolate, sugar, and cream in delicious desserts. This is because salt gives a huge burst of flavor like no other, be it in a sweet or savory dish. In this particular dessert, salt is a delightful counterpoint to rich and sweet caramel which helps it all tie into a mouthwatering symphony of flavors and textures, not to mention the chocolate.
Just before you go ahead and attempt this recipe, just be aware, for those who haven’t made caramels before, the sugar base becomes very hot and will boil vigorously when you add the cream to the mix, so be sure to use a deep pan to prevent spills and burns.
Recipe
What You Need
1 cup whipping cream
5 tbsps. salted butter
1 Tsp. fleur de sel
1 3/4 cup + 2 Tbsps. granulated sugar
1/4 cup corn syrup
1/3 cup water
1 Tsp. fresh lemon juice
Tempered dark or milk chocolate for enrobing
What To Do
Firstly, line a square pan with plastic wrap.
Mix together the butter, whipping cream and fleur de sel in a pan and bring them all to a boil. Once brought to a boil remove the pan from the heat and set the mixture aside.
In another pan, mix together the corn syrup, water, and sugar. Cook the mixture on high heat, do not stir and heat until the temperature is 360F or until it turns a dark caramel color. It usually takes around 5-10 minutes for this change to occur depending on what kind of stove and pan you are using.
Once done, remove the pan from the heat and stir the cream mixture in with a long handled spoon. Be sure to approach this with caution and this part is where the mixture can splatter on you. Now put the pan back on high heat and cook it, being sure to stir it constantly until the temperature reaches 250F. Now remove from heat and add lemon juice while stirring it in well.
Pour the mixture into a new pan and let it sit overnight.
Once it is set, take the caramel from the pan and peel off the plastic wrap. Cut the caramel into the desired shapes you want and place the caramels on a tray lined with parchment paper.
Holding the caramels with a fork, dip the caramels into tempered chocolate and place them onto another tray lined with a silicone mat.
When the chocolate is still wet, sprinkle a few grains of fleur de sel and let the caramels set for about 4 hours and then store them in an airtight container, in a cool, dry place for up to 3 weeks.
Quick And Easy Appetizers Using Cheese
Chevre is a delicious, soft cheese that is so easy to make. All you need to do is add a packet of chevre culture to a gallon of goat’s milk, let it sit and then drain the curds in a butter muslin. You don’t always have to use goat’s milk either, you can easily use cow’s or sheep’s, using the same directions.
If you don’t feel like making your own Chevre, you can purchase it at Shisler’s Cheese House, our Goat’s is to die for!
Endive Stuffed With Goat Cheese

What You Need
1/3 cup coarsely chopped walnuts
2 tablespoons honey, divided
Cooking spray
1/4 cup balsamic vinegar
3 tablespoons orange juice
16 Belgian endive leaves (about 2 heads)
1/3 cup (1 1/2 ounces) crumbled goat cheese or blue cheese
16 small orange sections (about 2 navel oranges)
1 tablespoon minced fresh chives
1/4 teaspoon cracked black pepper
What To Do
Preheat oven to 350F
Combine walnuts and 1 tablespoon honey; spread on a baking sheet coated with cooking spray. Bake at 350F for 10 minutes, stirring after 5 minutes.
Combine 1 tablespoon honey, vinegar, and orange juice in a small saucepan.
Bring mixture to a boil over high heat, and cook until reduced to 3 tablespoons (about 5 minutes).
Fill each endive leaf with 1 orange section. Top each section with 1 teaspoon cheese and 1 teaspoon walnuts; arrange on a plate. Drizzle the vinegar mixture evenly over leaves, and sprinkle evenly with chives and pepper.
Credit: myrecipes.com/recipe/endive-stuffed-with-goat-cheese-walnuts
Bacon Wrapped Jalapenos With Chevre

What You Need
10 jalapenos
4 ounces soft goat cheese
7-8 slices low-sodium, center-cut bacon
What To Do
Preheat the oven to 400F.
Cut the bacon slices into thirds.
Slice the top off each jalapeno, then cut each jalapeno in half. Remove the stems and seeds.
Fill each half jalapeno with about one teaspoon of goat cheese. Wrap each jalapeno in a third of a slice of bacon.
Put the wrapped jalapenos on a baking sheet and cook for 15 minutes. Then, turn on the broiler and broil for an additional 5 minutes.
NOTE: Serving size is two poppers.
Credit: healthyrecipeecstasy.com/spice-up-your-super-bowl-sunday-goat-cheese-stuffed-bacon-wrapped-jalapenos/
Goat Cheese Stuffed Peppadews

What You Need
6 ounces soft goat cheese, room temperature
2 large garlic cloves, minced
2 tablespoons chopped fresh basil, chives, thyme, or other fresh herbs
2 tablespoons heavy cream or half-and-half (as needed)
salt and pepper, to taste
1 jar Peppadew peppers (about 20-30 peppers)
What To Do
In a bowl, combine goat cheese with garlic and herbs, stirring until evenly incorporated. Add cream as needed, 1 tablespoon at a time, to thin out filling if necessary (the amount needed will depend mostly on the softness of your goat cheese). The filling should be the consistency of buttercream frosting.
Season to taste with salt and pepper.
Fill each Peppadew with about 1/2 teaspoon of filling. I find it helpful to load the filling into a piping bag fitted with a 1/4-inch round tip, which makes it very easy to neatly fill each pepper completely full.
Serve immediately or refrigerate for up to 2 hours; let come to room temperature for 15 minutes prior to serving.
Credit: loveandoliveoil.com/2013/10/goat-cheese-stuffed-peppadews.html
What To Do With Leftover Whey
You’ve taken that step to conquering the art of cheesemaking and you find yourself landed with a pound of delicious cheese, along with a whole lot of leftover whey. You’re wondering what can you do with all that protein rich whey? Lots of things- it does not need to go to waste!

Before you start, you need to know a few things about whey. Whey is basically milk but with the solids and fats removed from it (the solids now being your cheese). It may as well be water however it contains lactose (milk sugar) which is water soluble and ends up draining off with the whey. Now if you are lactose intolerant, it is advised that you avoid whey.
The biggest part of whey is whey protein, which you may be familiar with if you are an avid gym user. There are two types of protein within milk- whey and casein. Most of the casein from the milk ends up in the cheese which you make and most of the whey protein ends up in the whey, as you would guess from the name.
Back in the day of cheese making on a large scale, cheese makers needed to be creative to find a use for their leftover whey. Before industrial cheese making took over, farm cheesemakers would feed it directly to the cattle as a protein source. Nowadays, industrial cheesemakers have to find other ways to make use of the “waste”.
Cheesemaking companies began to market their leftover whey to companies which make protein-enriched products such as protein shakes and bars because whey is bursting with protein. Since then, the protein industry has boomed and has overcome the cheesemaking side of the business altogether.
In fact, the demand for whey protein has become so huge that it is no longer the by product and is actually the primary product for some large-scale cheesemakers. However, that being said, a home cheese maker is not likely to sell their three quarts of leftover whey to a protein shake manufacturer. There is really no need when there are so many uses for whey in your home. The only thing the end use depends on is whether the whey is salted or unsalted. There aren’t as many options for the salted variety as opposed to the unsalted:
Salted:
– Baking: You can use the whey in place of the water or milk when baking bread or pastry recipes. Make sure you omit the salt.
– Rich Homemade Stock: Save up your vegetable trimmings and bones as usual and use whey to cover them instead of water and bring it all to a boil and then let it simmer for a couple hours on low so that the flavor can be extracted.
Unsalted:
– Protein Smoothies And Shakes: You can make your homemade protein products by easily adding some whey to your shakes or smoothies to boost your protein.
– Feed To Animals: Now not everyone will be able to do this, but if you happen to have farm animals such as chickens, you can feed the whey to them. It is not advisable to feed it to your cats or dogs because like milk, it can have a bad effect.
– Bathe In It: Apparently, whey can work wonders on your skin like nothing else, it is definitely worth a shot.
– Drink It: The tang of whey may be an acquired taste but it can be refreshing. The cultured whey has probiotics that can help balance the microflora in your gut for a hidden bonus of the protein.
– Freeze for later – You can always freeze your whey for later. I recommend splitting it into smaller, manageable batches and freezing separately. It will keep in the freezer for up to 6 months, possibly longer.
– Ricotta – Many people ask about making ricotta from leftover whey. If you made cheese using a culture then you must do this. You still end up with some whey to use up, but you get some additional cheese from it.
These are just a sample of some of the uses you can get out of whey. There are so many that you will never have to throw whey out again!
Creating Homemade Coffee Cheese
Back in time, the coffee cheese was originally created from warm milk, straight from a reindeer and put in coffee to form a kind of snack. It was irresistible for someone of Northern Sweden and Tornedaling and can be just as mouthwatering to you!
Now, you may not have a reindeer or barn at hand, so you can just use raw milk or whole milk if you cannot get raw milk. Some of the time, you might not be able to get raw milk so pasteurized is fine to use, just be sure not to get UHT (Ultra-High Temp).

Recipe
What You Need
70 oz. of milk
2 oz. heavy cream
2 tsp liquid rennet
What To Do
First, pour the cream and milk into a large pan and heat to 99F.
Take the pan off the heat and stir in the rennet. Allow it to stand for 30-40 minutes or until the liquid has curdled.
Now stir gently with a slotted spoon while heating up the liquid to 99F again.
Once heated, spoon the cheese from the edges towards the center of the pan.
When the cheese is formed into a ball in the middle of the pan, heat it up to boiling point, but do not allow to boil. Take the pan off the heat to stop the whey boiling.
After taking the pan off the heat, place the cheese in either a large strainer, colander or even a cheese mold if you have one.
Be sure to press out the whey as much as possible from the cheese. Place a weight over the cheese and leave for a few hours so the remaining whey can be pressed out and the cheese dries up.
Preheat the oven to 392F and press the cheese into a greased casserole dish. Now bake the cheese into the center of the oven until it is browned.
You don’t have to bake the cheese, but it tastes a lot better when baked.
If the edges of the cheese become hard, you can just wrap it in aluminum foil afterward to soften them up.
There are many uses for the whey which is drained, for instance, using it to bake soft bread.
When the cheese is cooled, cut it into small squares, put some in a coffee cup and fill the cup with fresh coffee. Now stir it all up and eat with a spoon. The taste is so delicious, so enjoy!
If you have any left over, package it well and freeze it.
Making Something Different: Chaource Cheese
The name of this cheese alone is interesting, not to mention its unique flavor and form. You may never have heard of it, which makes it even more worth a try on firstly pronouncing (shah-oose) and then creating it!
Chaource is a mold-ripened cheese that originates from a small village in France called Chaource. It is usually made with both raw and pasteurized cow’s milk.
The rind of these cheese is similar to Camembert and has the same texture that just melts in your mouth. It can be aged for 2 weeks to 2 months and the flavor flourishes with time.
Down below is a big recipe for around 8 blocks of cheese, but you can easily half it if you so desire.

Recipe
What You Need
2 Gallons whole milk (can be pasteurized, but not ultra-pasteurized)
1/4 Tsp Mesophilic culture
1/8 Tsp Aroma Type B
1/4 Tsp Penicilium candidum
1/16 Tsp Geotrichum candidum
2 drops Animal rennet
Cheese salt
1/4 Tsp Calcium chloride
Equipment
8 Crottin molds
Thermometer
Butter muslin
Colander
Scoop or ladle
2 Bamboo ripening mats
Ripening box
Cheese wrap
What To Do
First things first, it is important that you sanitize every piece of equipment that will be used, including the ripening box.
Now dilute 1/4 tsp calcium chloride in 1/4 cup of non-chlorinated water and add this to the milk.
Heat the milk up slowly to 77F, checking the temperature with your thermometer.
Once the milk is warmed up, sprinkle all 4 cultures onto the milk and let it hydrate for around 3 minutes.
After 3 minutes, begin to stir the cultures for about 20 seconds into the milk.
Now cover the pot with a lid and let the milk ripen for around 8 hours, making sure the temperature stays at 77F for the entire period. If you are heating the pot with water, you might have to add hot water half way through the ripening to maintain the heat.
Add 2 drops of rennet to the milk and stir it in slowly for around 10 seconds.
Now cover the pot and allow it to sit for a further 8 hours, once again keeping the heat at 77F.
After the 8 hours is up, gently put the curds into a colander with a ladle, ensuring the colander is lined with butter muslin. Make sure you do not cut the curds. If you really wanted, you could skip this step and just ladle the curds directly into the molds but it can be quite difficult to get them all in.
Once in the colander, now ladle them into the 8 molds. Keep replenishing them as the whey drains from the molds.
If you would like to speed up the process of draining the whey from the molds, you can run a knife along the inside of the molds.
When the whey is getting to the bottom of the molds, empty the box. This step is important because the environment needs to be kept as dry as possible.
Let drain for around 48 hours. If the cheese seems firm enough, turn them around and put them back into the molds for 24 hours.
48 hours later, it is time to remove the cheeses from the molds and place them on wax paper or a paper towel whilst drying off the box.
Prepare your rack in the dry box.
Get each cheese and rub a thin layer of salt onto both ends of it. Be sure to wait a few minute between each end and then put each cheese into the box until they have all been salted.
Now close the lid on the box and place it in a space of 50-55F
Make sure you flip the cheeses every day and drain any whey in the bottom of the box.
The cheese will be ready to eat after 2 weeks of being in the box. If you are wanting to age them any longer, keep them in your cave with the lid ajar and make sure you flip them every day. Once you are ready to eat them, wrap them and place in the refrigerator. They’re best served at room temperature.
For All The Coffee Lovers Out There: Coffee Chocolate Truffles
Mmmm two of the best consumables in the world besides cheese- coffee and chocolate! Although coffee and chocolate is a common trend in foods, it is not easy to make perfectly delicious truffles especially when this recipe calls for you to use coffee instead of cream to make these lactose-free tastes of heaven.
In this recipe, it has been made with both 60 percent dark chocolate and high-quality milk chocolate. It is clear that dark chocolate wins overall as it produces an intensely flavored bonbon that is guaranteed to be mouth watering and a black coffee and dark chocolate addict’s dream come true.
However, if you prefer to put plenty of cream in your coffee and enjoy chocolate with less kick, making this recipe with milk chocolate will be better for you. All you have to do is reduce the coffee by 1/3 and use milk chocolate.

Recipe
What You Need
7 oz dark chocolate, chopped
1/2 tbsp. salted or unsalted butter
1/3 cup coffee or espresso, depending on how strong you want the coffee flavor (or 1 tbsp. and 2 tsp. if using milk chocolate)
1/2 cup unsweetened cocoa
What To Do
Firstly, put the chocolate into a bowl suitable for a blender. Place the coffee in a pan over medium heat until it is hot but not simmering and remove from the heat. Another method to heat the coffee can be placing it in the microwave for 30 seconds.
Pour the heated coffee over the chocolate and blend until the consistency becomes smooth.
Now add the butter and stir until the butter is well incorporated into the chocolate and coffee mixture. Make sure there are no lumps and that the chocolate is melted. Let the mixture stand at room temperature for one or two hours or until it has set and is firm.
Once the ganache is set, scrape a spoon across the surface. Dust your hands with cocoa and quickly press the truffle with your fingertips into 1 inch balls. Roll the balls in the cocoa until they’re well coated.
Now place the truffles on wax paper to set for several hours. You can store them in the refrigerator in an airtight container for around a week or freeze them for a month or so. Enjoy!
Using Tartaric Acid In Cheese Making
You can usually find tartaric acid in a lot of fruits, especially tamarind, from which tartaric acid is derived from a lot of the time. It is not only a product of cheese making though, it is also a by-product of the wine making process because it is also found in grapes.

We tend to use tartaric acid in making Mascarpone as it is an easy to make cheese and very inexpensive. It is perfect for beginners because it is consistent and works well.
It takes such a small amount of tartaric acid to make Mascarpone that when you use the full 1/4 teaspoon, there is enough to create Mascarpone 95 times from a 4-ounce packet of it. (Perfect for Tiramisu lovers!)
To make around 10-12 ounces of Mascarpone, food grade tartaric acid is used. All you have to do is add 1/4 teaspoon of tartaric acid to a quart of milk and cream or around 1/8 teaspoon for if you are using raw cream.
Recipe For Mascarpone With Tartaric Acid