Month: November 2024
Blue Cheese Tart (The Perfect Vegetarian Christmas Main)
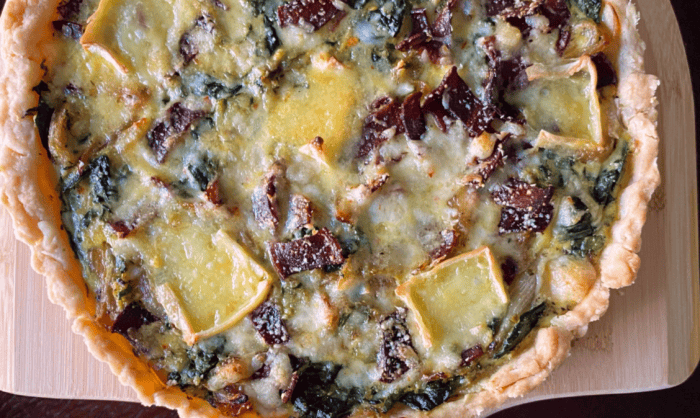
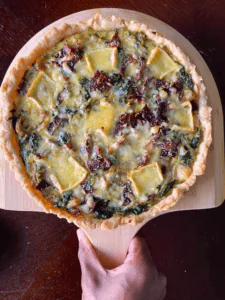
Blue Cheese Tart (With Swiss Cheese) – A Vegetarian Main for Christmas
This homemade blue cheese tart is topped with a layer of Swiss cheese and wrapped in golden puff pastry. This elegant tart is hearty enough to be the star of the meal and pairs beautifully with festive sides.
This recipe makes the perfect vegetarian main course or a side to pair with roast turkey, ham, and so on. The creamy blue cheese combines caramelized onions and a flaky crust—the thin slices of Swiss cheese layer on top to create a golden, bubbly finish.
Ingredients
Here’s what you’ll need to round up:
The pastry
- 1 sheet of puff pastry (store-bought or homemade)
- 1 tbsp flour (for rolling)
The filling
- 2 tbsp olive oil
- 2 medium onions, thinly sliced
- 2 cloves garlic, minced
- 1 cup heavy cream
- 3 large eggs
- 3 oz (85 g) blue cheese, crumbled
- 1 tsp fresh thyme leaves
- 1/2 tsp salt
- 1/4 tsp black pepper
The topping
- 4–5 slices of Swiss cheese
- Fresh thyme sprigs (for garnish, optional)
Instructions
Follow this step-by-step guide to make your own easy, absolutely delicious blue cheese tart.
Prepare the pastry
- Preheat your oven to 375°F (190°C).
- Roll out the puff pastry on a lightly floured surface and fit it into a 9-inch tart pan with a removable bottom. Trim the edges and prick the base with a fork to prevent puffing.
- Blind bake the pastry by lining it with parchment paper and filling it with pie weights or dried beans. Bake for 10 minutes, then remove the weights and bake for another 5 minutes until lightly golden.
Caramelize the onions
- Heat olive oil in a skillet over medium heat. Add sliced onions and cook, stirring occasionally, until golden and caramelized, about 15–20 minutes. Add garlic and cook for another minute. Set aside to cool slightly.
Make the filling
- Whisk together the heavy cream, eggs, blue cheese, thyme, salt, and pepper in a mixing bowl. Stir in the caramelized onions.
Assemble the tart
- Pour the filling into the pre-baked tart shell, spreading it evenly.
- Lay the Swiss cheese slices over the top, slightly overlapping to cover the surface.
Bake
- Place the tart in the oven and bake for 25–30 minutes, or until the filling is set and the Swiss cheese is golden and bubbling.
Serve
- Let the tart cool for 5–10 minutes before slicing. Garnish with fresh thyme sprigs for a festive touch, and serve warm.
Top Tips
- Choose quality cheese: Use a creamy, blue cheese like our Glacier Wildfire Gorgonzola for a balanced flavor. Go for Swiss cheese that melts beautifully, such as Gruyère or Emmental.
- Customize add-ins: Add sautéed mushrooms or roasted red peppers for extra flavor and texture.
- Prevent a soggy bottom: Ensure your tart crust is fully blind-baked before adding the filling to avoid a soggy base.
How to Store Leftovers
Cover the tart tightly with plastic wrap or place it in an airtight container. Store in the refrigerator for up to 3 days.
Slice the tart and wrap individual pieces in foil, then freeze for up to 1 month. Thaw overnight in the fridge before reheating. Warm slices in the oven at 300°F (150°C) until heated. For a crispy crust, reheat directly on a baking sheet.
Wrapping It Up
Don’t forget to check out our full range of cheese and accompaniments. We have so much to choose from and use as gifts and ingredients.
Artichoke Dip With Goat Cheese And Spinach
This artichoke dip with goat cheese is a creamy, savory dip made with goat cheese, spinach, artichokes, and Parmesan. It is an easy and perfect festive appetizer for a cozy gathering. Serve it warm with crackers, bread, or fresh vegetables for dipping.
If you loved this recipe, check out our post about Cheese Pairing with Festive Desserts: Unexpected Combos that Work.
Artichoke Dip with Goat Cheese and Spinach
This simple artichoke dip can be paired with other dips and served to kick off the evening. The goat cheese balances the rich, creamy artichokes.
Ingredients
- 8 oz goat cheese (chèvre), softened
- 1/2 cup grated Parmesan cheese
- 1/2 cup sour cream or Greek yogurt
- 1/4 cup cream cheese, softened
- 1 cup frozen spinach, thawed and drained (or 1 cup fresh spinach, chopped)
- 1 cup marinated artichoke hearts, chopped
- 1/4 cup mayonnaise
- 2 cloves garlic, minced
- 1 tbsp lemon juice
- Salt and pepper, to taste
- 1/4 tsp red pepper flakes (optional)
- 1/2 cup shredded mozzarella cheese (for topping)
Instructions
- Preheat oven: Preheat your oven to 375°F (190°C).
- Prepare the spinach: If using frozen spinach, thaw and squeeze out any excess moisture. If using fresh spinach, sauté it in a pan over medium heat for 2-3 minutes until wilted, then drain.
- Mix the base: In a large mixing bowl, combine the goat cheese, cream cheese, sour cream (or Greek yogurt), mayonnaise, and lemon juice. Stir until smooth and creamy.
- Add the flavorings: Add the grated Parmesan, garlic, chopped spinach, chopped artichokes, red pepper flakes (if using), and season with salt and pepper. Stir well until everything is evenly incorporated.
- Transfer to a baking dish: Spoon the mixture into a greased 9×9-inch (or similar-sized) baking dish, spreading it evenly.
- Top with mozzarella: Sprinkle the shredded mozzarella cheese over the top of the dip.
- Bake: Bake in the oven for 20-25 minutes or until the top is golden and bubbly.
- Serve: Let the dip cool slightly before serving. Serve warm with crackers, sliced baguette, or fresh vegetable sticks (like celery, carrots, or cucumber).
Top Tips
- Spinach: Be sure to squeeze out all excess liquid from thawed frozen spinach to prevent the dip from being too watery.
- Artichokes: Marinated artichokes provide extra flavor, but you can use canned artichokes if you prefer a milder taste.
- Add-ins: Feel free to experiment with other add-ins like sautéed mushrooms, roasted red peppers, or a handful of fresh herbs (such as thyme or basil) to change the flavor profile.
- Goat cheese consistency: For a smoother dip, ensure the goat cheese is softened before mixing. If you prefer a chunkier texture, use crumbled goat cheese instead.
How to Store it
- Refrigeration: Store leftover dip in an airtight container in the fridge for 3-4 days.
- Reheating: Reheat gently in the oven at 350°F (175°C) for 10-15 minutes, or microwave in 30-second intervals until heated.
- Freezing: This dip can be frozen for up to 2 months. Let the dip cool completely to freeze, then transfer it to an airtight container or freezer-safe dish. When ready to serve, thaw overnight in the fridge and reheat in the oven.
Wrapping It Up
This creamy dip is guaranteed to be a crowd-pleaser with its rich flavors and smooth texture, making it an excellent choice for your next holiday party or gathering! Reach out to us with any questions via our contact page.
Cheese Pairing with Festive Desserts: Unexpected Combos that Work
Cheese Pairing Ideas For Festive Desserts: Unexpected Combos that Work
Cheese pairing isn’t just about cheese and crackers as part of your snacks—it can bring an exciting twist to your dessert table, too! Pairing cheese with festive sweets creates unique flavor experiences that enhance both sweet and savory elements.

Explore unexpected cheese pairing combinations like sharp cheddar with apple pie or creamy blue cheese with dark chocolate. Plus, try out a cheerful dessert board.
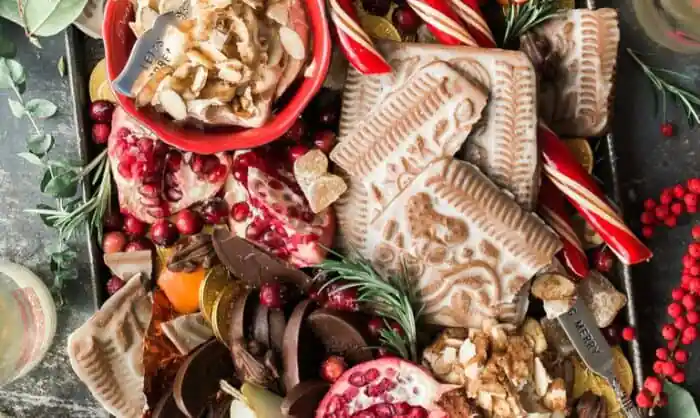
In this article we share cheese pairing ideas with gingerbread cookies, whipped apple butter, goat cheese (Chevin), candy canes, and seasonal fruits for an easy-to-assemble, crowd-pleasing spread.
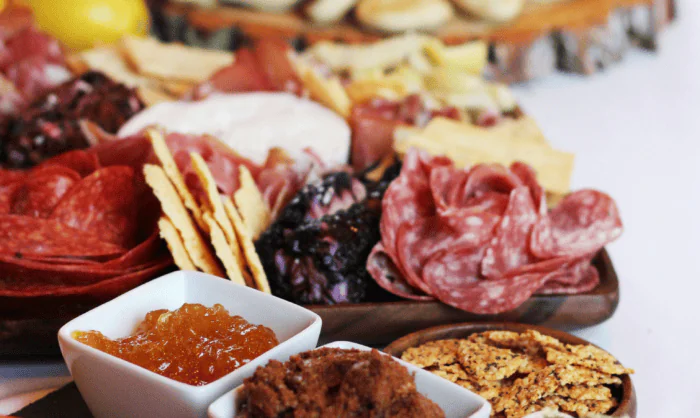
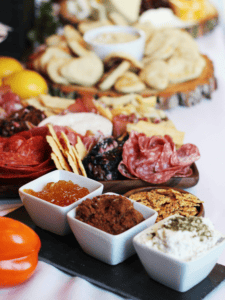
A Festive Dessert Cheese Board with Gingerbread, Whipped Apple Butter, Goat Cheese & More
For a truly festive dessert board, bring together traditional holiday flavors with a fun mix of treats. Start with gingerbread cookies for a spiced and sweet base that pairs well with creamy cheeses.
Next, add a small bowl of whipped apple butter for a sweet, smooth spread. This is especially delicious when combined with goat cheese (Chevre). Goat’s cheese has a mild tanginess contrasts beautifully with the sweet apple butter and spicy gingerbread.
Round out the board with some seasonal flair by adding mini candy canes and fresh holiday fruits like pomegranate arils, clementines, and red grapes. These fruits add a burst of color and juicy sweetness that complements the other items on the board.
With these exciting cheese and dessert pairings, your holiday dessert spread will be as unique as it is delicious.
Cheddar and Apple Pie
The pairing of Canadian aged cheddar cheese with apple pie is a classic that has stood the test of time.
The sharp, salty taste of cheddar complements the sweetness and warmth of spiced apple filling. This combination creates a perfect balance of flavors.
For this pairing, go for a sharp or aged cheddar. It offers a strong, complex flavor that won’t get lost against the apple pie’s sweetness.
Serve small wedges of cheddar alongside individual slices of apple pie or mini hand pies for easy enjoyment.
You could also get creative by baking shredded cheddar directly onto the crust for an elevated version of this beloved pairing. Another fun idea is to serve apple and cheddar skewers—alternate cubes of cheddar with apple slices for a tasty, bite-sized treat.
Blue Cheese and Dark Chocolate
Blue cheese and dark chocolate might seem like an unexpected match, but their rich flavors complement each other beautifully. The earthy, slightly tangy flavor of blue cheese plays well with the bold bitterness of dark chocolate.
On your dessert board, break the dark chocolate into small pieces and place them next to a wedge of blue cheese. Or, create small bites by spreading a little blue cheese on top of dark chocolate squares.
You could also get creative by making dark chocolate truffles with a hint of blue cheese in the center—an adventurous twist for your holiday spread!
Beer Cheese and Fig Jam
Beer cheese and fig jam is a gentle, crowd-pleasing pairing that brings joy to any dessert table. The mild, buttery flavor of beer cheese pairs beautifully with the sweetness of our housebrand fig jam, which adds a hint of earthy complexity.
For this pairing, simply place a dollop of fig jam on each slice of beer cheese, or serve the cheese and fig jam side by side for easy spreading.
This combination works beautifully with fresh figs, sliced pears, or crackers.
Wrapping It Up
We have the most incredible cheese selective available for you to browse. Don’t miss our meats and accompaniments too!
Thanksgiving Cheese Ideas For Kids
Thanksgiving Cheese Ideas for Kids
If you’re hunting for Thanksgiving cheese ideas for kids, we’ve got you! When setting up the Thanksgiving table, cheese is an easy and popular snack choice. Typically, kids love cheese just as much as adults, so don’t leave them out!
This year, try out one or two of these fun and easy Thanksgiving cheese ideas for kids. Choose snacks that are festive, tasty, and perfect for little hands.

Cheese Turkeys
Cheese turkeys are a playful way to bring a touch of Thanksgiving spirit to snack time. To make these adorable treats, all you need are cheese rounds, veggie slices, and pretzel sticks.
Here’s how to create your own cheesy turkeys:
- Prepare the cheese rounds: choose something like Brick cheese that you can slice and can into rounds. This works well for this project. Place one cheese round per turkey on a platter.
- Add pretzel “feathers”: insert small pretzel sticks into the top half of the cheese round to create feather-like fanning behind the turkey’s head.
- Decorate with veggies: use a small slice of carrot for the turkey’s beak and black olives or edible markers for eyes.
- Add “wattles”: a small piece of red pepper or dried cranberry works perfectly to give your turkey that Thanksgiving charm.
Kids can even help assemble their own cheese turkeys, adding a personal touch to the display. Arrange the turkeys on a tray with additional veggie sticks and crackers to create a Thanksgiving-themed snack platter that’s both fun and delicious.
Mini Cheese Logs
Cheese sticks are a holiday classic, but turning them into mini versions on a stick makes them extra fun and easy for kids to enjoy.
These bite-sized treats are perfect for little hands, and the different coatings give each one a unique flavor and look. Here’s how to make your own platter of mini cheese balls on a stick.
Ingredients
- 8 oz. cream cheese or goat’s cheese, softened
- 1 cup shredded white cheddar cheese
- 1 tsp garlic powder
- 1 tsp onion powder
- Salt and pepper to taste
- Toppings for rolling (chopped nuts, dried cherries, fresh herbs like parsley or chives)
- Mini skewers
Instructions
- Make the cheese mixture: In a bowl, combine the cream or goat’s cheese, shredded cheddar, garlic powder, onion powder, salt, and pepper. Mix well until everything is evenly combined and smooth.
- Form the cheese logs: Use a spoon to scoop small portions of the cheese mixture, then roll each into a oblong log shape with your hands.
- Roll in toppings: Set out small bowls of your toppings (chopped nuts, dried cranberries, herbs) and roll each cheese ball in your choice of coating. For a festive look, create a variety platter by using different toppings for different balls.
- Assemble with sticks: Insert a toothpick or mini skewer into each cheese log to make it easy for kids to grab.
Arrange the mini cheese logs on a platter, alternating between the different coatings to create a colorful display. These little snacks are perfect for a Thanksgiving party or a family gathering, giving kids the chance to try new flavors while enjoying a familiar treat.
Cheese and Fruit Kabobs
If your kids like fruit, adding it to cheese on a kabob is a surefire way to make it even more appealing. Use cubes of mild cheese, like cheddar or mozzarella, and pair them with kid-friendly fruits like grapes, strawberries, or pineapple.
Simply thread the cheese and fruit onto small skewers or toothpicks, alternating between the two for a fun and nutritious snack. This snack is quick to assemble and can be tailored to include your kids’ favorite fruits.
These kid-friendly cheese snacks bring holiday joy to the table with minimal fuss and lots of fun. They’re easy to make, visually festive, and, best of all, they help make holiday gatherings more inclusive and enjoyable for everyone—even the smallest guests!
Wrapping It Up
We hope this post brought you some family fun inspiration! Don’t forget to check out our selection of cheeses here, plus our selection of accompaniments.


